Showing posts with label Ricinig. Show all posts

how to preview glyphs and install bitmap font on linux

hello, welcome back to my blog. Today i wanna share something about font, there are bitmap font. before we go, font is displayable text character on your screen including how it looks, and size. so, what is bitmap font ?

bitmap font is font that producing pixel (a picture) from each letter and the image from the font is called glyphs, the bitmap font is not flexible as you thing i.e if you resizing to upscale it's degrade in quality. but, it's faster to load themselves than reguller image.

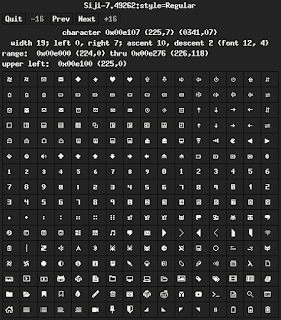
you can install bitmap font linux and reviewing them using xfd command, it will show you up everything character from what font are you view. bitmap font is usually for web programing or configuring bar as a panel for your desktop like lemonbar, dzen2, or anything that similar to that. But, sometimes you cannot see them like picture that i attach below.


Because some Linux distro's disabled them by default, and you can fix that by follow this step below "how to preview bitmap font on Linux" for example i will choose Siji bitmap font and trying to preview on my Linux system and let's go on!
installing font as user:
1. git clone https://github.com/stark/siji && cd siji
2. mkdir ~/.local/share/fonts
3. ./install.sh -d ~/.local/share/fonts
4. add this script to your start up
xset +fp /home/username/.local/share/fonts
xset fp rehash

installing font as root:
1. go to ~/.local/share/fonts/ and copy siji.pcf to /usr/share/fonts

enable preview bitmap font on linux :
1. sudo rm /etc/fonts/conf.d/70-no-bitmaps.conf
2. sudo fc-cache -f -v
3. done now you can check the font using this commad fc-list | grep "Siji" and if you success the result is like image below


4. now you can generate glyph code using xfd
xfd -fa siji and the result will be like this


If your system does not detect the font or not enabling bitmap font, xfd comment will displaying Dejavu - sans font like picture above on top.

And there it is, the short guide to enable or fix preview bitmap font on Linux. for more article please follow up this blog and stay tune. if you wanna ask something or appreciate my post just comment on comment section below, and don't forget to share to your friend or family to help spread good information. stay safe and healty, see ya on next article!

How to remove Ads on spotify client windows

hi guys, hope we safe. during this pandemic stay home its better and when staying home it will be nice while hearing music. if you using spotify but your premium subs has ended, here some trick to block a banner ads on spotify client windows pc (if you using linux i will be uumm give it to you too on below) and yeah the ads will be gone. Before we go i wanna say thanks to my bro Harry Elric on facebook for give me a clue about this.


here some depedencies after we start the tutorial (you must install this first)

  1. Scoop
  2. curl (install using scoop, on power shell type this command scoop install curl)
  3. spicetify 

and if you finish for installing three depedencies above lets follow this step.

1. goto C:\Windows\System32\drivers\etc copy hosts file to another directory and open up host file then insert this line at the bottom

127.0.0.1 https://d5ecgvacntsb3.cloudfront.net

127.0.0.1 https://www.spotify.com/premium?utm_source=Spotify_premiumupsell

127.0.0.1 https://spclient.wg.spotify.com/ads/*

127.0.0.1 https://spclient.wg.spotify.com/ad-logic/* 

as the result will be like this pict:


2. and put back edited hosts file to C:\Windows\System32\drivers\etc just replace it!

3. goto powershell and type 

spicetify (hit enter)

spicetify backup apply enable-devtool

4. it will be open up a spotify, for example goto liked song and if you see banner ad just right click on it then select inspect element


5. search this element (ctrl+f)

<div id="wiew-leaderboard-ad" 

and this

<div id="view-billboard-ad" class="billboard"

and delete that two things, just right click on the element then hit the delete element. like this pict :

for <div id="wiew-leaderboard-ad" 


and for <div id="view-billboard-ad" class="billboard"


6. yups, your done! the banner ads has been gone.. enjoy it!


but you can still hearing the audio advertisement like:


7. if you close and open it again the ads will be back, to delete it again just repeat step number 5 ONLY!


yay, that how to remove ads without premium subs. its for education only, no anymore! and if you using a linux you can follow this links also you can follow my tutorial tho. dont forget to leave comments if you wanna ask about this tutorial. and this articel is for educational only, buy the premium is better than doing like this. :D 

how to show albumart on ncmpcpp

okey in this article, i wanna show you how to make your ncmpcpp look beauty like your girlfriend. that its how to show album arts on ncmpcpp, its possible to show casue you don't need again album text statement. but, now you can look album picture when your play music on ncmpcpp.
this my ncmpcpp

okey lets move into step.


1. copy this scritp into your ~/.ncmpcpp/config


% egrep -v '^#' .ncmpcpp/config
mpd_music_dir = "/home/user/Music/"

mpd_host = "127.0.0.1"
mpd_port = "6601"
mouse_list_scroll_whole_page = "yes"
lines_scrolled = "1"

visualizer_in_stereo = "no"
visualizer_fifo_path = "/tmp/mpd.fifo"
visualizer_output_name = "my_fifo"
visualizer_sync_interval = "10"
visualizer_type = "spectrum"
visualizer_look = "▋▋"

message_delay_time = "3"
playlist_shorten_total_times = "yes"
playlist_display_mode = "classic"
browser_display_mode = "columns"
search_engine_display_mode = "columns"
playlist_editor_display_mode = "columns"
autocenter_mode = "yes"
centered_cursor = "yes"
user_interface = "classic"
follow_now_playing_lyrics = "yes"
locked_screen_width_part = "60"
display_bitrate = "no"
external_editor = "nano"

main_window_highlight_color = "white"

progressbar_elapsed_color = "white"
progressbar_color = "black"

#progressbar_look = "▃▃▃"
progressbar_look = "─⊙ "

mouse_support = "yes"
header_visibility = "no"
statusbar_visibility = "no"

statusbar_color = "white"
visualizer_color = "white"
titles_visibility = "no"
enable_window_title = "yes"

now_playing_prefix = "$b"
now_playing_suffix = "$8$/b"

#now_playing_prefix = "$u$2"
#now_playing_suffix = "$2$/u$2"

song_columns_list_format = "(6)[]{} (23)[red]{a} (26)[yellow]{t|f} (40)[green]{b} (4)[blue]{l}"

color1 = "white"
color2 = "black"

song_list_format = " $5%l  $7%t $R$5%a "

#uncomment both statement's below if you want to display the albumart

execute_on_song_change="~/.ncmpcpp/art.sh"
song_list_format = "                               $2%t $R$5%a "

song_status_format = "$b$7♫ $2%a $4⟫$3⟫ $8%t $4⟫$3⟫ $5%b "
song_window_title_format = " {%a} - {%t}"

2. and copy this code and save as art.sh to ~/ncmpcpp and making that script is executable by use that command chmod +x art.sh

#!/bin/bash

#put this file to ~/.ncmpcpp/


MUSIC_DIR=/media/dante/deb/Sounds/ #path to your music dir

COVER=/tmp/cover.jpg

function reset_background
{
    printf "\e]20;;100x100+1000+1000\a"
}

{
    album="$(mpc -p 6601 --format %album% current)"
    file="$(mpc -p 6601 --format %file% current)"
    album_dir="${file%/*}"
    [[ -z "$album_dir" ]] && exit 1
    album_dir="$MUSIC_DIR/$album_dir"

    covers="$(find "$album_dir" -type d -exec find {} -maxdepth 1 -type f -iregex ".*/.*\(${album}\|cover\|folder\|artwork\|front\).*[.]\(jpe?g\|png\|gif\|bmp\)" \; )"
    src="$(echo -n "$covers" | head -n1)"
    rm -f "$COVER"
    if [[ -n "$src" ]] ; then
        #resize the image's width to 300px
        convert "$src" -resize 300x "$COVER"
        if [[ -f "$COVER" ]] ; then
           #scale down the cover to 30% of the original
           printf "\e]20;${COVER};70x70+0+00:op=keep-aspect\a"
        else
            reset_background
        fi
    else
        reset_background
    fi
} &

3. in the art.sh look into MUSIC_DIR line and set the variable to your music dir. example:

 MUSIC_DIR=/media/dante/deb/Sounds/

4. assure, you have a album art picture in your music dir . i suggest, to make sub folder for your music with same album. like this, and dont forget to rename your picture album to cover.jpg
5. the dependecies you must have is mpc and imagemagick. at here i use 6601 port on my mpc and mpd, so you can change it to your port how much you use
and bingo, if you got flick on urxvt just adjust the geometry.

yeah that its, if you have question, comment , and thanks, just comment below. lets disqus.

how to lemonbar configuration

today, i wanna tell you how to configuration lemonbar or lemonbar configruation. lemonbar (formerly known as bar) is a lightweight bar entirely based on XCB. Provides full UTF-8 support, basic formatting, RandR and Xinerama support and EWMH compliance without wasting your precious memory. so lets begin.

to install lemonbar and load font on lemonbar you can go here > installing lemonbar and load font on lemonbar

remember lemonbar is statusbar, not panel. so, its not any taskbar. just print the output.

we wanna fetching information about :
1. date
2. ssid of wifi
3. batery
4. sound level
5. clock
6. window active status
7. music
8. icon for this item

1. fetching the date
 we would use date command to print out that.

date '+%d %b' #this print day number of the month and month

2. ssid of wifi
we would use iwgetid command to make simply setup but powerfull. let's se bellow

iwgetid -r  # it just print the ssid no other

3. battery
its important to avoid the low battery status and urged you to chare your laptop. i use acpi command to make it simple

acpi | cut -d, -f2 #its only  print battery level

4. sound level
sound level can print into two type of output. can be proggesbar and can be text. if you wanna proggressbar use mkb and if you want text lets follow me.
we use amixer command.

amixer get master | grep "Front Left:" | awk '{print $5}' | cut -d [ -f2 | cut -d ] -f1 # its only print sound level

5. clock
as same as with date we use date command

date '+%H:%M'

6. window active status
window active status only print the name of focused window not like panel clickable and print the name. we use xdotool command

xdotool getwindowfocus getwindowname

7. music
we use mpd and mpc command to print the listening music status

mpc -p 6601 -f "%artist% >> %title%" | head -1

8. icon for this item
you must install siji font to get icon for this ouput and to make more beautiful setup of bar.
if you already install that font let's follow

run this command to get the glymphes code
xfd -fa Siji
and choose icon what you want to print at your bar setup for example:
the glymphes code of music icon is : 0x00e05c to print on the bar just run like this
echo -e "\ue05c" | lemonbar -f "Siji-8" -p #this print with bar standalone not fetch with all

PRINT THEM ALL ONLY WITH LEMONBAR
this setup will be eat more reosources of ram, coz you will run two lemonbar to get bar on right and left. but, not much eat resource. on this setup we would use bash script, if statement, case statement, while true do, and function like a C. oke let's follow.

make bash script like this
1. for status item of lemonbar

$vim statusquh

#!/bin/bash
#arg
#ndow="$(xdotool get_desktop | grep 0)"
#inf="$(mpc -p 6601 -f "%artist%" | head -1 | wc -l)"
#wifikek='iwgetid -r | wc -l'
#bat='acpi -i | head -1 | cut -d, -f1 | cut -d: -f2 | sed 's/ //g' | grep "Charging" | wc -l'


case $1 in

 window)
 ndow=`xdotool get_desktop | wc -l`
 if [ $ndow -eq 1 ]; then
 xdotool getwindowfocus getwindowname
 fi
 ;;

 musik)
 inf=`mpc -p 6601 -f "%artist%" | head -1 | wc -l`
 if [ $inf -eq 1 ]; then
 mpc -p 6601 -f "%artist% >> %title%" | head -1
 else
 echo not playing
 fi
 ;;

 volume)
 amixer get Master | grep "Front Left:" | awk '{print $5}' | cut -d [ -f2 | cut -d ] -f1
 ;;

 wifi)
 wifiqu=`iwgetid | wc -l`
 if [ $wifiqu -eq 0 ]; then
 echo "off"
 else
 iwgetid -r
 fi
 ;;

 infobat)
 bat=`acpi -i | head -1 | cut -d, -f1 | cut -d: -f2 | sed 's/ //g' | grep "Charging" | wc -l`
 if [ $bat -eq 1 ]; then
 echo "Charging"
 else
 echo "Discharging"
 fi
 ;;

 desktop)
 des=`xdotool get_desktop | wc -l`
 if [ $des -eq 1 ]; then
 xdotool get_desktop
 fi
 ;;

 batre)
 acpi | cut -d, -f2
 ;;

 jam)
 date '+%H:%M'
 ;;

 tanggal)
 date '+%d %b'
 ;;

esac

save this code and move into /usr/local/bin/ with this command

 sudo mv statusquh /usr/local/bin

2. now then, for left lemonbar

$vim kiri

#!/bin/bash

#colour
red="#D24D57"
case $1 in
semua)
nda() {
    echo -e "\ue0b1" && statusquh window
}

ndi() {
    echo -e "\ue224" && statusquh infobat
}

ndu() {
    echo -e "\ue10f" && statusquh wifi
}

nde() {
    echo -e "\ue107" && echo Hana
}

while :; do
kok="$(nda)"
kek="$(ndi)"
kuk="$(ndu)"
kik="$(nde)"

echo $kok $kek $kuk $kik
sleep 1
done
;;
esac

save it, and move into /usr/local/bin

3. and this for right lemonbar

$vim kanan

#!/bin/bash

#colour
red="#D24D57"
case $1 in
semua)
nda() {
    echo "%{F$red}TGL:%{F-}" && statusquh tanggal
}

ndi() {
    echo "%{F$red}JAM:%{F-}" && statusquh jam
}

ndu() {
    echo "%{F$red}VOL:%{F-}" && statusquh volume
}

nde() {
    echo "%{F$red}BAT:%{F-}" && statusquh batre
}

while :; do
kok="$(nda)"
kek="$(ndi)"
kuk="$(ndu)"
kik="$(nde)"

echo $kok $kek $kuk $kik
sleep 1
done
;;
esac

save it and move into /usr/local/bin

5. for lemonbar to print out that

$vim barkiri

#!/bin/bash
kiri semua | lemonbar -p -f "Clean-10" -f "Siji-8" -g 1366x24

save it and move into /usr/local/bin

6. for second lemonbar to print out that

$vim barkanan

#!/bin/bash
kanan semua | lemonbar -p -f "Clean-10" -g 250x24+1116+0

7. testing time !
for testing. run kiri and kanan like this

$barkiri
$barkanan

the result is like this

if you want find much more about lemonbar configuration or my dotfile just visit my github page > dante08
oke, i hope you can do about configuration lemonbar. only that for me, littlebit about lemonbar especialy about lemonbar configuration. so thank you much.

how to change lightdm and default wallpaper of WM background using mate desktop

hi guys. now, i wanna tell you to change background of lightdm (if you use it haha) and use mate desktop. its begining, because i think "how to change it? with manualy mode, not GUI.?!" so, its not trhought GUI mode. but, this is use the command. and then i will explain how is it.. lets follow this step.

1. first prepare your wallpaper, what you want to applied for background and put in home dir.

2.open terminal and type command below

$cd /etc/lightdm/
# -your favorite text editor- lightdm-gtk-greeter.conf

3. and fill background input with your background file
background = /path/dir/*.jpg or background = /path/dir/*.png
example: background = /home/es-cendol/bg_lightdm/1.jpg

4. its could change user image too, fill at default-user-image input with your avatar.
default-user-image = /path/dir/*.png
example: default-user-image = /home/es-cendol/dNTE.png

5. save it

6. restarting your lightdm, type command bellow
$sudo service lightdm restart

7. tarraa... bingo..

note : this method i tested at ubuntu mate 16.04. so, why you not try at your mate ?.

one more, its could change window manager wallpaper at your desktop. so, you dont need feh, or etc and you dont need put in rc.local to change wm wallpaper; its, dont need. i've been tested with some Window manager like 2bwm, openbox, and pekwm. maybe its done so on i3wm and other wm.
thanks for visit and practice. fail or not, feedback, and etc leave comment bellow, i hope you can do this method and i hope this method is usefull for you.

how to install googler on linux : google in your terminal


hi guys, now i wanna tell you how to install googler on ubuntu based. "googler is power tool to google (web & news) and google site search from the command line. it show the tittle, URL and abstract for each result" - (github.com/jarun). googler is leightweight to monitoring your web in googler without open your browser. but, googler is stay need a connection to search result. googler is available on :
- AUR
- Homebrew
- Debian
- Ubuntu
- Ubuntu PPA

but, here i  wanna explain to build googler from source. follow the step.

1. download the package at here
git clone https://github.com/jarun/googler/

2. change your self into that directory
cd googler/

3. and then run it to install
sudo make install

4. and tara.. try running googler with your keyword
example : $ googler facebook

that its the step i hope you successfull in try this step. ok thank you so much..

courtesy of github.com/jarun

how to install ncmpcpp from source

hi guys, now i wanna tell you how about compile or install or build ncmpcpp from source. actualy, you can install from PPA or your repository. but, if newest or latest ncmpcpp its not able in your repository what are you doing ? so you must update or compile from source, right?.

oke first you need gcc and g++ its used to compiling. and you must install it
in ubuntu just type
- apt-get install gcc g++
and then you need some depedencies to build ncmpcpp
this is the list of depedencies, you can use apt-get install, your synaptic, and install manualy like this.
-lboost_filesystem
-lboost_system
-lboost_locale
-lboost_program_options
-lboost_regex
-licuuc
-licudata
-lboost_thread
-lmpdclient
-lreadline
-lpthread
-lncursesw
-ltinfo
-libmad0-dev libmpg123-dev libid3tag0-dev 
-libflac-dev libvorbis-dev libopus-dev 
-libadplug-dev libaudiofile-dev libsndfile1-dev libfaad-dev 
-libfluidsynth-dev libgme-dev libmikmod2-dev libmodplug-dev 
-libmpcdec-dev libwavpack-dev libwildmidi-dev 
-libsidplay2-dev libsidutils-dev libresid-builder-dev 
-libavcodec-dev libavformat-dev 
-libmp3lame-dev 
-libsamplerate0-dev libsoxr-dev 
-libbz2-dev libcdio-paranoia-dev libiso9660-dev libmms-dev 
-libzzip-dev 
-libcurl4-gnutls-dev libyajl-dev libexpat-dev 
-libasound2-dev libao-dev libjack-jackd2-dev libopenal-dev 
-libpulse-dev libroar-dev libshout3-dev 
-libmpdclient-dev 
-libnfs-dev libsmbclient-dev 
-libupnp-dev 
-libavahi-client-dev 
-libsqlite3-dev 
-libsystemd-daemon-dev libwrap0-dev 
-libcppunit-dev xmlto 
-libboost-dev 
-libicu-dev

next, you can download ncmpcpp source from here if already downloaded you can exstrack this file.
and then, goto ncmpcpp extacted folder, open terminal and type
> ./configure
if you not see any error next type
> sudo make
if you not see any error next type
> sudo make install
wait untill proccess done, if done check with run ncmpcpp -v in terminal and the version of ncmpcpp change into 0.7.7 you have already done to compiling ncmpcpp from source. happy singing with ncmpcpp. :D

note :
if you see error, check again your depedencies, log error,compiling tool and makefile missing.

cara install lemonbar di ubuntu


hay guys balik lagi nih.. kemarin kan ane dah ngasih cara untuk konfigurasi lemonbar nih
sekarang ane mau ngasih cara install nya nih.. untuk cara konfigurasi bisa diliat disini guys..
oke langsung aja guy..

lemonbar itu bar yang simple dan entirely gan dia berbasis xcb. jadi kamu sebelum menginstall nya kamu harus menginstall library tambahan gan seperti libxcb-xinerama0-dev
oke ini step untuk install lib nya

- buka terminal
- tulis atau copas kode command ini ke terminal yang anda buka tadi

sudo apt-get install libxcb-xinerama0-dev
sudo apt-get install libxcb-randr0-dev

- dan lakukan seperti layaknya install paket seperti biasanya :D
- jika sudah menginstall nya lanjut ke lemonbar nya..
- disini saya menggunakan metode gitclone gan..
- buka terminalnya yang tadi lalu pastekan di terminal nya kode dibawah ini (satu persatu)

git clone https://github.com/LemonBoy/bar.git
cd bar
make
sudo make install

note : usahakan anda pertama buka terminal itu anda berada di home jika bukan silakan ketikan cd terminal untuk mengganti posisi anda ke home

oke gan begitu aja cara nya, jika kurang paham dan ada log mas eror komen dibawah ya..
sekian terimakasih.

how to disable icon and window tittle on openbox


hi, i just wanna share into english version and before i already post into bahasa indonesia. bahasa indonesia you can found here

oke guys lets to the step.

- log in with openbox
- in your desktop, right click and choose obconf or you can launch them via terminal
- and looking for appearance
- in appearance, looking for window border
- and at window border, input this like picture above
- and then, re-apply your theme..
- and taarraa, Bingo!

just it i only can share this post.. and see you ! :D

cara menghilangkan window tittle dan ikon app di openbox


hay guy.. kali ini ane pingin berbagi cara menghilakan tittle window di openbox nih guys.. openbox adalah salah satu window manager di linux yang simple banyak sekali window manager di linux tapi yang ane bahas cuma openbox :D
but, if you want to found in english version you can find here
oke langsung cara nya guys..
- masuk ke openbox
- di desktop klik kanan lalu pilih obconf
- jika sudah di obconf masuk ke tab appearence
- lalu isikan window border nya seperti gambar ini
- lalu re apply theme kalian dan tara.. :D

begitu saja guys.. semoga bermanfaat dan selamat ricing.. :D

konfigurasi sederhana lemonbar di linuxmint dan ubuntu

hay guys..
kali ini ane mau berbagi pengalaman di ane di linux gan..
ane mau berbagi seperti diatas..
oke langsung aja gan..

- lemonbar
install dan ikuti langkah nya di mari gan.. ni ini
lalu jika sudah jalankan command "lemonbar" di terminal kalian
kan gak ada apa apa nya tuh.. coba masukin script ini lalu beri judul example.sh  dan beri permision rw semua

 #!/bin/bash

#Define the battery
Battery() {
        BATPERC=$(acpi --battery | cut -d, -f2)
        echo "$BATPERC"
}

#Daefine the clock
clock() {
    date +%H:%M:%S
}

# Print the percentage
while true; do
        echo "%{l}$(Battery) %{c}$(clock)"
        sleep 1;
done


scrip diatas buat nampilin clock dan batre gan..
kalo mau jalanin file nya ketikan
./example.sh | lemonbar -p

untuk menampilkan system tray di lemonbar lalu jalankan bersama dengan lemonbar nya

lemonbar -B#202020 -F#ffffff -g 1000x18+150+30 -a 10 | trayer --edge top --align right --widthtype request --height 18 --tint 0x292b2e --transparent true --expand true --SetDockType true --alpha 0 --margin 220 --distance 30

yap tinggal di kreasikan ya gan...


segitu saja untuk setting awal lemonbar nya.. sekian terimakasih gan..

Search This Blog

Powered by Blogger.

About Us

Nama Blog

All About PC

Blog ini hanya membahas tentang pc, jika ada yang lain maka label atau tag nya saya taroh di lain-lain. mari belajar via internet :D

Earn Bitcoin with EZ click, no scam! TESTED BY ME

Advertisement

Formulir Kontak

Name

Email *

Message *