How to Installing Dolby Atmos for Gaming

 Hi, guys. apa kabar semua ? semoga sehat selalu dan dalam perlindungan allah ya semua nya. Kali ini saya akan membahas tentang sound driver nih yang tentu nya akan meningkatkan pengalaman kalian dalam mendengarkan media yang kalian putar seperti bermain game, menonton film, mendengarkan music, dan lain sebagainya. Oh iya, maaf ya dari kemaren bikin artikel pakai bahasa inggris terus soalnya lagi belajar menggunakan bahasa inggris. Lebih tepat nya, menulis menggunakan bahasa inggris dengan baik dan benar. Jika banyak salah mohon di maafkan ya, namanya juga lagi belajar menulis hehe jangan lupa di komen aja di artikel yang bersangkutan.

Nah jadi kita akan membahas tentang Dolby nih, lebih tepat nya menginstall Dolby Atmos for Gaming. Dolby Atmos merupakan teknologi suara surround atau suara sekitar yang di perkenalkan oleh Dolby Laboratories pada tahun 2012 yang awal nya untuk bioskop, namun sekarang teknologi ini sudah bisa kita nikmati di perangkat kesayangan kita seperti PC (Personal Computer), Android, Xbox One, dan masih banyak lagi. Lalu apa bedanya Dolby Atmos for Gaming dengan Dolby Atmos yang biasa ? tidak jauh berbeda hanya saja variant Dolby Atmos For Gaming lebih banyak fitur untuk kebutuhan Gaming tentunya. Namun meski berfokus pada gaming, digunakan untuk musik dan menonton film tidak kalah bagus nya malah menurut saya lebih enak yang Dolby Atmos for gaming ketimbang yang Dolby Atmos Basic.

Lalu cara menginstall Dolby Atmos itu sulit gak sih ? tentu saja tidak sob, menginstall Driver Dolby Atmos for Gaming sangat mudah hanya saja butuh ketelitian dikarenakan ini driver jadi salah sedikit bisa saja mengganggu kinerja hardware nya. Kepo kan cara menginstall nya bagaimana ? lebih baik kita langsung saja yuk ke tahap Install Driver Dolby Atmos for Gaming nya, disini saya menggunakan windows 10 build 1909 ya teman teman.

  1. Klik tombol start, pilih settings untuk masuk ke pengaturan windwos 10 nya.
  2. Ketika sudah masuk, pilihlah Update & Security kemudian klik For Developer.
  3. Dan rubahlah menjadi Developer Mode seperti gambar dibawah ini.

  4. Lalu kita akan masuk ke mode "Test Mode" atau "Disable driver signature enforcement" cara nya silakan kunjungi link berikut ini -KLIK DISINI- kemudian lihat step nomor 3a - 3e, nah untuk 3e jangan klik tombol 4 melainkan klik tombol 7 di keyboard untuk masuk ke mode "Test Mode" atau "Disable driver signature enforcement".
  5. Setelah itu Dwonload Driver Dolby Atmos for Gaming di link berikut ini. -KLIK DISINI-
  6. Ekstrak Driver Dolby Atmos for Gaming yang sudah di download tadi.
  7. Kemudian tekan tombol windows + X di keyboard dan pilih "Device Manager", klik Sound, Video, and Game Controller. lalu klik kanan pada Realtek HD audio kemudian pilih Unsintall Device dan centang kolom yang tersedia kemudian klik Uninstall.

  8. Maka otomatis perangkat yang sebelum nya bernama Realtek HD audio menjadi HD Audio Devices, kemudian cari dan klik kanan HD Audio Devices yang sebelemunya bernama Realtek HD audio tadi kemudian pilih update driver.

  9. Kemudian pilih "Browse my computer for Driver Software" kemudian pilih "Let Me pick" kemudian pilih "Have a Disk" kemudian browse dan cari hasil ekstrakan dolby driver nya seperti gambar dibawah ini.

  10. kemudian pilih open dan oke, kemudian pilih next dan install. jika ada pop up merah pilih saja install this driver blablabla, jangan takut karena ini bukan sebuah ancaman melainkan jenis driver yang un-signed saja. 
  11. setelah selesai buka folder hasil ekstrakan tadi dan pilih folder gaming control panel lalu double click untuk menginstall nya.
  12. dan Dolby Atmos for gaming pun telah siap digunakan.

Saran saya agar tidak terjadi lag dikarenakan bentrok, uninstall driver audio sebelumnya yang sudah saya terangkan pada point ke 7. Karena itu dapat mengganggu sekali pada saat anda bermain game kompetitif seperti PUBG, waktu itu saya mengalami hal serupa fps yang tadi nya 75 lalu menjadi drop ke 30an fps ketika saya sambungkan ke discord dan open mic di ingame. Nah setelah saya unsintall driver audio sebelum nya, fps saya kembali normal. jika kalian menggunakan PC Desktop sebagai alat tempur nya, saya sarankan untuk mencolok kan jack nya di port audio motherboard agar suara nya lebih jernih. saya sudah membandingkan suara front panel dengan soundcard mobo (backpanel) alhasil yang front panel lebih tebal,berat,surround sound tidak jelas dan nusuk sedangkan yang backpanel alias bawaan mobo lebih jernih, tidak menusuk dan kerasa surround nya dengan jelas. By the way, headphone yang saya gunakan adalah Corsair HS50-PRO.

oke guys, segitu aja dari saya. semoga bermanfaat, apabila ada yang ingin di tanyakan silakan komentar dibawah biar kita diskusikan bersama dan jangan lupa share keteman teman kalian ini artikel agar lebih bermanfaat. sekian guys, dan sampai jumpa di artikel berikutnya.

HOW TO INSTALL ANDROID 10 (Resurrection Remix OS) ON SAMSUNG GALAXY J5 PRIME

Hello guys, today im gonna share how to updating your SAMSUNG J5 prime G570Y to android 10 using GSI ROM. This phone is still rocking with their new custom ROM, is enough for daily use but no for high level gaming because their chipset is out of date for it and we try to give more live to this phone for save our planet from electronic waste because electronic waste is always increase and can damaging our planet. so, there is many benefit for updating phone OS to the latest version. Anyway, this is our first post about android and we decide to rebrand our blog for more context from PC (Personal Computer) to PC (Phone & Computer) guide.


The benefit you can get from updating your phone system is better performance, it's mean you will get responsive system like loading faster smooth effect when scrolling or opening apps. You can get longer battery life if your update is stable version, because in some update will fixing the old bug or bring the new bug (in short we all know, in this world is nothing perfect) And of course it's bring a new feature. 

We all know Samsung J5 Prime is only up to android 8, and if you ask "is this safe ?" i will say no and depend on you. Because this method is unofficial, this is what community do try to give more life to their phone and it can be bricked your phone if you do something stupid and miss the guide then it depend on the phone condition it's self (basically the emmc healt is being considered). So, this method is not for newbie but for advanced user. If you wanna learn something new it's okey and im not responsible if your phone get bricked and you better ask to be accompanied by an expert.

The rom type we gonna use is GSI, what is GSI ? GSI is generic system image that pure Android implementation with unmodified Android Open Source Project (AOSP) code, and it can be runnable on a variety of Android devices (mainly the dev lead of the community will be bring the new feature for their rom project). and for cutting the time, im gonna show you to Installing GSI rom on the Samsung J5 Prime android 10.

1. you must unlocking your phone to install TWRP on Samsung J5 Prime

2. download the all file below :

a. Exynos7570_create vendor 2.0 : http://j.gs/15221567/exynos7570create...​ (Google Drive Link)

b. KEBAB2.0_Exynos7570 : http://j.gs/15221567/kebabv2​

c. Resurrection Remix 8.6.4  A/B ROM GSI : http://j.gs/15221567/resurrection-remix​ (Source Forge Link)

d. GAPPS (playstore) : http://j.gs/15221567/gapps​ (Source Forge Link)

3. backup your data.

4. extract Resurrection Remix for J5 Prime using winrar on pc or z-archiever on a phone to get img file (but i dont try extracting on a phone)

5. boot to twrp

6. install Exynos7570_create vendor 2.0

7. after install, don't choose reboot system just go back on main menu of the twrp and click on reboot and choose reboot recovery (if you get blank screen don't panic, just press power btn + home + vol down and hold until the phone goes off and don't realease the buton just switch the vol down btn to vol up btn and hold it until to twrp mode)

8. do wipe dalvlik, data, system, cache. after that install KEBAB2.0_Exynos7570 

9 reboot recovery (if you get blank screen don't panic, just press power btn + home + vol down and hold until the phone goes off and don't realease the buton just switch the vol down btn to vol up btn and hold it until to twrp mode)

10. after that, press INSTALL and choose INSTALL IMAGE and browse your Resurrection Remix 8.6.4.img. wait until the proccess done, and choose reboot system

here for video tutorial : 


and you done! you get the android 10 on samsung galaxy J5 prime, for tutorial video i already attached on above. if you wanna install playstore and magisk here the guide

1. after installing the rom let it boot to the home screen for first time

2. reboot to recovery

3. and install GAPPS (playstore) : http://j.gs/15221567/gapps​ (Source Forge Link) and magisk 21.2 like usual.

4. and reboot system

and you done, magisk will show up after 2 - 5 minutes after boot. just wait it! 

and thank for your time to read this article, hope this useful and give you more knowledge. and let see on next article! just leave the comment if you have something you want to ask. bye!

How to fix GPU detected as Microsoft Basic Display Adapter and cannot install driver after building a PC

Hallo, welcome back to my blog! hope you all healthy as always, today i wanna tell you about building PC. alright, for now PC and laptop is needed because pandemic make everything online as possible like meeting, presenting, classes, and many more. especially on gaming, in this situation gaming activity is increase because when someone get bored they must looking for something that entertaint their entire mood.

The one of important part of PC is GPU, General Processing Unit is designed to accelerate graphics rendering simply it can displaying image or whatever on your screen. System will detect automatically what type of GPU do you use on your rig, you don't worry about that. But, sometimes if you facing the error like your system did not detect that hardware properly, you must check the originality of hardware do you use. 


You can check authentic of your hardware using GPU-Z, it will give you all information about your GPU including the authenticity of the graphics card you are using and if your GPU are fake this will show like picture below.

If your hardware detected as Microsoft Basic Display adapter and you realize your GPU is original and not fake but you cannot install the driver according from official website and you come in the right site. Because i wanna sharing about How to fix GPU detected as Microsoft Basic Adapter and cannot install driver after building a PC, Microsoft Basic Display adapter is software built-in on windows that provides display and graphics capabilities when software from your hardware manufacturer isn't installed. 

I had this problem when i building a PC yesterday, I bought used GPU from marketplace and when I installing on my RIG and detected as Microsoft basic adapter and I cannot installing the actual driver. so, what I do is :

  1. download DDU (Display Driver Uninstaller) from guru3d.com, here click on this link
  2. and extract it
  3. reboot PC into save mode, here I show you how to boot your pc on save mode:
    a. press and hold shift on your keyboard
    b. still hold shift, go to start button click on power and choose restart and keep your thumb hold shift key!

    c. until you see as picture below and choose troubleshoot your PC

    d. choose start-up settings

    e. click restart, after that you will see this as picture below. press 4 to enter safe mode.

    f. and you entered to safe mode! now follow step number 4
  4. go to file explorer and search DDU which extracted before and double click on that .exe
  5. and after that you will see pop-up screen that contain "look like you first time using DDU" just click yes
  6. if you see this screen as picture below, and if you use NVIDIA GPU mark Remove PhysX and close

  7. Select GPU on ---select device type--- option and Select what brand do you use of your GPU on ---select device--- option, in here i use NVIDIA so i choose NVIDIA.
  8. And click Clean and Restart.

  9. wait until process done. and your PC will restart automatically.
  10. after restart complete, try install the driver again. it should work!
    you can use windows update assistant too, but if your internet is limited you can try this method. alright, hope this helpful for you all. if you have any question just comment below on comment section, hope you guys always healthy, my article is helpful, and see you guys on next article! Bye bye.

how to preview glyphs and install bitmap font on linux

hello, welcome back to my blog. Today i wanna share something about font, there are bitmap font. before we go, font is displayable text character on your screen including how it looks, and size. so, what is bitmap font ?

bitmap font is font that producing pixel (a picture) from each letter and the image from the font is called glyphs, the bitmap font is not flexible as you thing i.e if you resizing to upscale it's degrade in quality. but, it's faster to load themselves than reguller image.

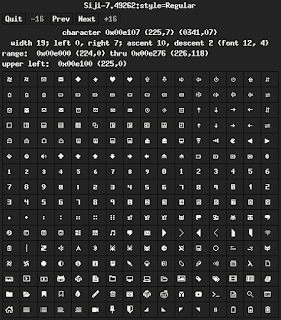
you can install bitmap font linux and reviewing them using xfd command, it will show you up everything character from what font are you view. bitmap font is usually for web programing or configuring bar as a panel for your desktop like lemonbar, dzen2, or anything that similar to that. But, sometimes you cannot see them like picture that i attach below.


Because some Linux distro's disabled them by default, and you can fix that by follow this step below "how to preview bitmap font on Linux" for example i will choose Siji bitmap font and trying to preview on my Linux system and let's go on!
installing font as user:
1. git clone https://github.com/stark/siji && cd siji
2. mkdir ~/.local/share/fonts
3. ./install.sh -d ~/.local/share/fonts
4. add this script to your start up
xset +fp /home/username/.local/share/fonts
xset fp rehash

installing font as root:
1. go to ~/.local/share/fonts/ and copy siji.pcf to /usr/share/fonts

enable preview bitmap font on linux :
1. sudo rm /etc/fonts/conf.d/70-no-bitmaps.conf
2. sudo fc-cache -f -v
3. done now you can check the font using this commad fc-list | grep "Siji" and if you success the result is like image below


4. now you can generate glyph code using xfd
xfd -fa siji and the result will be like this


If your system does not detect the font or not enabling bitmap font, xfd comment will displaying Dejavu - sans font like picture above on top.

And there it is, the short guide to enable or fix preview bitmap font on Linux. for more article please follow up this blog and stay tune. if you wanna ask something or appreciate my post just comment on comment section below, and don't forget to share to your friend or family to help spread good information. stay safe and healty, see ya on next article!

How to Optimizing and Enable Nvidia Reflex on GTX 960 ( GTX 900 Series) in Fortnite

Hallo, welcome back to wandapcguide. Hope, we're healthy and safe. Recently, NVIDIA announce new feature for their graphic card product called NVIDIA REFLEX Low Latency. So what is NVIDIA REFLEX Low Latency ? if you put your graphic settings to the high or max it will produce more latency to be render by GPU and NVIDIA REFLEX is mode that can reduce latency in game, now you don't to be worry about latency if your put your game graphic settings to the high or max. because the method is Just-in-time rendering so they eliminating the GPU render queue and reducing CPU back pressure in GPU intensive scene, that can help you to win the game especially on competitive games. 

more about REFLEX Low Latency mode ? click here

Good News for those who still keep GTX 900 & 1000 Series, because they give the feature from GTX 900 series until RTX 3000 series. So, we will be discuss how to optimizing and enabling NVIDIA REFLEX on GTX 960 2GB in Fortnite. Note is depend on your hardware system combination, so make it yours on the in-game graphic settings. First, let me introduce my hardware for testing in this article.

CPU : i3-9100f

GPU : STRIX GTX 960 2GB

RAM : 4x2 GB

MB  : MSI H310M PRO-VH PLUS

Second, we jump to the topics "how to optimizing and enable NVIDIA REFLEX on GTX 960 2GB in fortnite", there is 3 easy step available :

step one :

1. update your graphic card driver to the latest version

2. go to NVIDIA control panel, click manage 3d settings and look for global settings. under that scroll and find "Low Latency mode"

3. change to ultra, or look picture below for gain understandable.

4. click on Program Settings, choose fortnite on "select a program to customise" and change as i mentioned below
OpenGL rendering GPU : GTX 960
Power management mode : Prefer maximum mode
Texture filtering - anisotropic sample optimisation : On
texture filtering - quality : High Performance 
texture filtering - trilinear optimasation : On

Step two:

1. download the Nvidia Profile Inspector link here
2. run Nvidia Profile Inspector, if opened look on the top left corner on the window there is profile click on that and look for fortnite.
3. under Sync and refresh, look the point and change the value as i mentioned below
Frame rate limiter : PS_FRAMERATE_LIMITER_DISALLOWED
Frame rate limiter Mode : Limiter V2 - Force Off 
Maximum Pre Rendered Frames : 1
Prefered Refreshrate : Highest Available

or see this image below to gain more understandable.


step three:

run the game and goto settings, on graphic settings scroll down and you will found "nvidia Reflex Low Latency" because our graphic card is supported and change it to the on + boost it will help more than "ON" only. i recomended you to run under DirectX 12 it becasue make your game look beautiful and better performance.

and adjust your in game graphic settings, i sett everything on epic except shadow also put 3D resolution to the 100% And its depend on your network too. If your network is bad, your game performance will be bad too. and there its, happy holidays and gaming. If you have any question, please leave it on comment below don't be hesitate for ask something :D

if you looking for my gameplay using this settings, you can check the video below and skip to the 04:09 minutes

and see you guys next time!

Cara Dual Monitor pada PC atau Laptop Menggunakan HP android

Halo pembaca, semoga sehat selalu ya baik orang nya dan PC nya juga. Semoga pembaca terhindar dari virus COVID-19 dan selalu produktif walau lagi #DIRUMAHAJA, aktivitas dirumah saja membuat kita beraktifitas seacar daring. Mulai dari kegiatan belajar dan mengajar, rapat, dan lainnya, maka dari itu membuat kita lebih sering aktifitas di depan layar terutama pada masa seperti ini.


Layar pun menjadi salah satu faktor utama agar kita dapat berkomunikasi, bekerja, atau bersantai saat masa pandemi seperti ini; Kalian pasti membutuhkan workspace lebih dalam mengelola layar anda agar dapat memaksimalkan multitasking anda, bahkan mungkin terasa di beberapa diantara kita bahwasanya layar atau monitor satu saja sekarang merasa kurang atau tidak cukup. Sedangkan pada masa sekarang ini ekonomi kita semua bisa dibilang tidak stabil dan harga monitor itu bisa mencukupi makan kita beberapa minggu kedepan. Nah disini saya akan memberikan solusi gimana sih cara dual monitor PC menggunakan HP android, atau menggunakan laptop tanpa ribet.

Gambar Dual monitor menggunakan Android

Hal ini akan sangat berguna bagi kalian yang ingin kinerja multitask yang lebih maksimal, atau bagi kalian yang ingin punya monitor dua tapi belum kesampaian hehe. Kita ambil contoh saja seperti streamer yang membutuhkan dua monitor yang satu untuk bermain game dan yang satu lagi untuk membuka dashboard streaming nya agar lebih enak memonitoring stats dari live streamingnya tanpa menekan ALT+TAB untuk berpindah pindah setiap saat. Serta bagi yang baru memulai bergelut di desain grafis tapi memakai monitor yang layar nya berpanel TN itu akan sangat mudah sekali tanpa harus export setengah hasil kemudian pindah ke hp untuk menyesuaikan warna, tinggal drag saja ke layar hp yang dijadikan monitor tadi sudah kelihatan hasilnya.


Lantas bagaimana cara nya ? oke langsung saja kita bahas cara nya ya, dan simak cara nya dibawah ini.

Bahan :
  1. Download Spacedesk untuk primary PC atau PC utama yang ingin di tambahi monitor, KLIK DISINI pilih sesuai OS yang kalian gunakan
  2. Lalu jika kalian ingin menjadikan HP android nya sebagai monitor tambahan untuk PC utama silakan download ini (link playstore) dan apabila kalian ingin menjadikan laptop sebagai monitor tambahan untuk PC utama silakan download ini untuk melanjutkan (versi windows dan untuk versi macOS bisa download disini)
  3. satu jaringan dengan PC utama

Langkah - Langkah :
  1. Pastikan di kedua perangkat sudah terdownload dan sudah di install aplikasi Spacedesk nya untuk bisa melanjutkan ke tahap dual monitor menggunakan android nya.
  2. kemudian buka aplikasi Spacedesk pada PC utama kalian, kira kira tampilan nya akan seperti gambar dibawah ini.

  3. biarkan saja terbuka, kemudian kita beralih ke perangkat yang ingin dijadikan dual monitor oleh PC utama yaitu hp android nya, buka aplikasi Spacedesk nya dan akan tampil daftar perangkat PC utama nya seperti gambar diabawah ini.
  4. kemudian klik tulisan Connection : -ip komputer utama-
  5. dan voila! anda sudah berhasil menjadikan hp android kalian sebagai monitor tambahan untuk pc kalian.

Note :
  1. proses ini tidak menghambat proses pengisian ulang hp androdi kalian jadi aman jika android nya digunakan sambil pengisian daya berlangsung.
  2. perlu di ingat saat anda berada di jarigan public jangan lupa untuk mematikan spacedesk pada PC utama yang kalian bawa (misal lagi di wifi corner, cafe, dan sebagainya) karena orang lain pun dapat mengendalikan PC kalian jika kalian lupa mematikan nya. cara mematikan nya gampang, tinggal klik tanda titik tiga dibawah logo komputer kecil di aplikasi spacedesk pc kalian kemudian klik dan pilih OFF seperti gambar dibawah ini
  3. untuk mengatur resolusi pada HP android nya, kalian bisa mengatur pada aplikasi spacedesk di android nya dengan klik tanda titik tiga di pojok kanan atas layar kemudian pilih settings > resolution dan atur custom resolution sesuai yang kalian mau. saya pribadi menggunakan resolution 800x600 agar enak dibaca dari jarak 30cm. dikarenakan hp saya kecil jadi saya atur resolusi sedemikian agar tampak besar.
  4. untuk yang menggunakan laptop sama saja proses nya hanya saja beda platform untuk aplikasinya.
Jadi ini cara nya tidak hanya untuk android saja ya, bisa juga untuk laptop juga bahkan tablet. selamat beraktifitas ya para pembaca sekalian, semoga tetap produktif dan sehat. sebelum itu jangan lupa tinggalkan komen jika ada yang ingin di tanyakan dan jangan lupa share ketemen temen kalian agar temen temen kalian tau cara membuat dual monitor menggunakan android! share di sg, snap wa, atau di kanal sosmed kalian terserah yang penting share saja karena ini bermanfaat sekali. dan akhir kata wasalam! 

How to make PC Games run smoothly on 30FPS like a console

**This article language is going fully with Bahasa Indonesia. So, please use a translate. To make sure you understand what you read here*  *NOW THE ARTICLE ARE IN FULL ENGLISH* 


Hi, hope you doing well wherever you ar. Have you ever think that game on console like PS4 or Xbox One feel so smooth ? designed to be more optimal in running games with graphics that are managed in such a way.

Who would have thought, even though it was smooth like that the FPS on the game console is 30 fps. When compared to the PC's 30 fps, it's a lot different even if you use the RTX 2080Ti, why is that? Because there is an out of sync between the number of frames sent to the monitor by the graphics card and the refresh rate on the monitor

Of course, with capable hardware and ready to bulldoze a game with the highest graphics settings and more than 60fps it is very enjoyable and many people have experienced it. Then what about our brothers and sisters who only have PC with minimum hardware according to the requirements listed in the game, and want to play without any lag or stutter or decent on it ?

Besides lag, this can eliminate tearing while playing games. Important, the time in sending a frame is called frametime and the frametime needed to send 30fps is 33.33 milliseconds. So, how do we make 30 fps on a PC game as smooth as a console? see how to make 30fps PC games as smooth as consoles (PS4/XBOX1) below:

  1. Turn off v-sync and frame limiter in your in-game settings.
  2. Then, download Rivatuner Statistics Server (RTSS) here (guru3d.com link) or you can install MSI Afterburner with RTSS bundle.
  3. Install RTSS and then run the program.
  4. If the application is open, please click the green "add" button, then browse to the exe file of the game you want to set. see picture below for demo.

  5. Then click your game on the RTSS you just added and set the frame limiter to 30, for more details, please see the image below.

  6. Hold on, not finished yet. after that minimize the RTSS and don't close it. Then download Nvidia Profile Inspector  here (github link from DeadManWalkingTO).
  7. If it has been downloaded, extract the Nvidia Profile Inspector then run the program.
  8. Wait for the loading from the Nvidia Profile Inspector to complete, then browse the game title on the profile in the top menubar, for more details see the image below. 

  9. If so, look for the Sync and Refresh section and click Vertical Sync then change the value to 1/2 Refresh Rate. Like the picture below.

  10. And if you have clicked apply change on the Nvidia Profile Inspector. and close if it has been applied.
  11. Then run the game with RTSS are still running (so every time you want to play the game, first open the RTSS application so that the configuration is loaded)
*this method applies to Nvidia graphics cards, there is no other way but to change the refresh rate through the control panel every time you want to play the game for graphics card users other than nvidia

Tara .. and you will get smooth gameplay like a console (PS4/XBOX1). This method is useful for those of you who want to get a stable frame, keep in mind you have to keep V-Sync and frame limiter off in-game then to get a beautiful and smooth movement visual,
please turn on Motion Blur in in-game.
Because the average game on the console to cover terrible experience they add a Motion blur effect to the game so that the image looks smooth.

and the following video results from the configuration of making a PC game run at 30fps as smooth as a console:

Alright, that's it for this article. and thanks for Maya for the advice, if there is something you want to ask, or so, please leave it in the comments column. See you in the next article.

Search This Blog

Powered by Blogger.

About Us

Nama Blog

All About PC

Blog ini hanya membahas tentang pc, jika ada yang lain maka label atau tag nya saya taroh di lain-lain. mari belajar via internet :D

Earn Bitcoin with EZ click, no scam! TESTED BY ME

Advertisement

Formulir Kontak

Name

Email *

Message *