How to fix GPU detected as Microsoft Basic Display Adapter and cannot install driver after building a PC

Hallo, welcome back to my blog! hope you all healthy as always, today i wanna tell you about building PC. alright, for now PC and laptop is needed because pandemic make everything online as possible like meeting, presenting, classes, and many more. especially on gaming, in this situation gaming activity is increase because when someone get bored they must looking for something that entertaint their entire mood.

The one of important part of PC is GPU, General Processing Unit is designed to accelerate graphics rendering simply it can displaying image or whatever on your screen. System will detect automatically what type of GPU do you use on your rig, you don't worry about that. But, sometimes if you facing the error like your system did not detect that hardware properly, you must check the originality of hardware do you use. 


You can check authentic of your hardware using GPU-Z, it will give you all information about your GPU including the authenticity of the graphics card you are using and if your GPU are fake this will show like picture below.

If your hardware detected as Microsoft Basic Display adapter and you realize your GPU is original and not fake but you cannot install the driver according from official website and you come in the right site. Because i wanna sharing about How to fix GPU detected as Microsoft Basic Adapter and cannot install driver after building a PC, Microsoft Basic Display adapter is software built-in on windows that provides display and graphics capabilities when software from your hardware manufacturer isn't installed. 

I had this problem when i building a PC yesterday, I bought used GPU from marketplace and when I installing on my RIG and detected as Microsoft basic adapter and I cannot installing the actual driver. so, what I do is :

  1. download DDU (Display Driver Uninstaller) from guru3d.com, here click on this link
  2. and extract it
  3. reboot PC into save mode, here I show you how to boot your pc on save mode:
    a. press and hold shift on your keyboard
    b. still hold shift, go to start button click on power and choose restart and keep your thumb hold shift key!

    c. until you see as picture below and choose troubleshoot your PC

    d. choose start-up settings

    e. click restart, after that you will see this as picture below. press 4 to enter safe mode.

    f. and you entered to safe mode! now follow step number 4
  4. go to file explorer and search DDU which extracted before and double click on that .exe
  5. and after that you will see pop-up screen that contain "look like you first time using DDU" just click yes
  6. if you see this screen as picture below, and if you use NVIDIA GPU mark Remove PhysX and close

  7. Select GPU on ---select device type--- option and Select what brand do you use of your GPU on ---select device--- option, in here i use NVIDIA so i choose NVIDIA.
  8. And click Clean and Restart.

  9. wait until process done. and your PC will restart automatically.
  10. after restart complete, try install the driver again. it should work!
    you can use windows update assistant too, but if your internet is limited you can try this method. alright, hope this helpful for you all. if you have any question just comment below on comment section, hope you guys always healthy, my article is helpful, and see you guys on next article! Bye bye.

how to preview glyphs and install bitmap font on linux

hello, welcome back to my blog. Today i wanna share something about font, there are bitmap font. before we go, font is displayable text character on your screen including how it looks, and size. so, what is bitmap font ?

bitmap font is font that producing pixel (a picture) from each letter and the image from the font is called glyphs, the bitmap font is not flexible as you thing i.e if you resizing to upscale it's degrade in quality. but, it's faster to load themselves than reguller image.

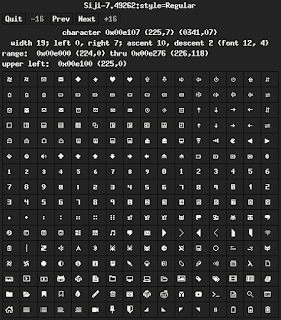
you can install bitmap font linux and reviewing them using xfd command, it will show you up everything character from what font are you view. bitmap font is usually for web programing or configuring bar as a panel for your desktop like lemonbar, dzen2, or anything that similar to that. But, sometimes you cannot see them like picture that i attach below.


Because some Linux distro's disabled them by default, and you can fix that by follow this step below "how to preview bitmap font on Linux" for example i will choose Siji bitmap font and trying to preview on my Linux system and let's go on!
installing font as user:
1. git clone https://github.com/stark/siji && cd siji
2. mkdir ~/.local/share/fonts
3. ./install.sh -d ~/.local/share/fonts
4. add this script to your start up
xset +fp /home/username/.local/share/fonts
xset fp rehash

installing font as root:
1. go to ~/.local/share/fonts/ and copy siji.pcf to /usr/share/fonts

enable preview bitmap font on linux :
1. sudo rm /etc/fonts/conf.d/70-no-bitmaps.conf
2. sudo fc-cache -f -v
3. done now you can check the font using this commad fc-list | grep "Siji" and if you success the result is like image below


4. now you can generate glyph code using xfd
xfd -fa siji and the result will be like this


If your system does not detect the font or not enabling bitmap font, xfd comment will displaying Dejavu - sans font like picture above on top.

And there it is, the short guide to enable or fix preview bitmap font on Linux. for more article please follow up this blog and stay tune. if you wanna ask something or appreciate my post just comment on comment section below, and don't forget to share to your friend or family to help spread good information. stay safe and healty, see ya on next article!

How to Optimizing and Enable Nvidia Reflex on GTX 960 ( GTX 900 Series) in Fortnite

Hallo, welcome back to wandapcguide. Hope, we're healthy and safe. Recently, NVIDIA announce new feature for their graphic card product called NVIDIA REFLEX Low Latency. So what is NVIDIA REFLEX Low Latency ? if you put your graphic settings to the high or max it will produce more latency to be render by GPU and NVIDIA REFLEX is mode that can reduce latency in game, now you don't to be worry about latency if your put your game graphic settings to the high or max. because the method is Just-in-time rendering so they eliminating the GPU render queue and reducing CPU back pressure in GPU intensive scene, that can help you to win the game especially on competitive games. 

more about REFLEX Low Latency mode ? click here

Good News for those who still keep GTX 900 & 1000 Series, because they give the feature from GTX 900 series until RTX 3000 series. So, we will be discuss how to optimizing and enabling NVIDIA REFLEX on GTX 960 2GB in Fortnite. Note is depend on your hardware system combination, so make it yours on the in-game graphic settings. First, let me introduce my hardware for testing in this article.

CPU : i3-9100f

GPU : STRIX GTX 960 2GB

RAM : 4x2 GB

MB  : MSI H310M PRO-VH PLUS

Second, we jump to the topics "how to optimizing and enable NVIDIA REFLEX on GTX 960 2GB in fortnite", there is 3 easy step available :

step one :

1. update your graphic card driver to the latest version

2. go to NVIDIA control panel, click manage 3d settings and look for global settings. under that scroll and find "Low Latency mode"

3. change to ultra, or look picture below for gain understandable.

4. click on Program Settings, choose fortnite on "select a program to customise" and change as i mentioned below
OpenGL rendering GPU : GTX 960
Power management mode : Prefer maximum mode
Texture filtering - anisotropic sample optimisation : On
texture filtering - quality : High Performance 
texture filtering - trilinear optimasation : On

Step two:

1. download the Nvidia Profile Inspector link here
2. run Nvidia Profile Inspector, if opened look on the top left corner on the window there is profile click on that and look for fortnite.
3. under Sync and refresh, look the point and change the value as i mentioned below
Frame rate limiter : PS_FRAMERATE_LIMITER_DISALLOWED
Frame rate limiter Mode : Limiter V2 - Force Off 
Maximum Pre Rendered Frames : 1
Prefered Refreshrate : Highest Available

or see this image below to gain more understandable.


step three:

run the game and goto settings, on graphic settings scroll down and you will found "nvidia Reflex Low Latency" because our graphic card is supported and change it to the on + boost it will help more than "ON" only. i recomended you to run under DirectX 12 it becasue make your game look beautiful and better performance.

and adjust your in game graphic settings, i sett everything on epic except shadow also put 3D resolution to the 100% And its depend on your network too. If your network is bad, your game performance will be bad too. and there its, happy holidays and gaming. If you have any question, please leave it on comment below don't be hesitate for ask something :D

if you looking for my gameplay using this settings, you can check the video below and skip to the 04:09 minutes

and see you guys next time!

Cara Dual Monitor pada PC atau Laptop Menggunakan HP android

Halo pembaca, semoga sehat selalu ya baik orang nya dan PC nya juga. Semoga pembaca terhindar dari virus COVID-19 dan selalu produktif walau lagi #DIRUMAHAJA, aktivitas dirumah saja membuat kita beraktifitas seacar daring. Mulai dari kegiatan belajar dan mengajar, rapat, dan lainnya, maka dari itu membuat kita lebih sering aktifitas di depan layar terutama pada masa seperti ini.


Layar pun menjadi salah satu faktor utama agar kita dapat berkomunikasi, bekerja, atau bersantai saat masa pandemi seperti ini; Kalian pasti membutuhkan workspace lebih dalam mengelola layar anda agar dapat memaksimalkan multitasking anda, bahkan mungkin terasa di beberapa diantara kita bahwasanya layar atau monitor satu saja sekarang merasa kurang atau tidak cukup. Sedangkan pada masa sekarang ini ekonomi kita semua bisa dibilang tidak stabil dan harga monitor itu bisa mencukupi makan kita beberapa minggu kedepan. Nah disini saya akan memberikan solusi gimana sih cara dual monitor PC menggunakan HP android, atau menggunakan laptop tanpa ribet.

Gambar Dual monitor menggunakan Android

Hal ini akan sangat berguna bagi kalian yang ingin kinerja multitask yang lebih maksimal, atau bagi kalian yang ingin punya monitor dua tapi belum kesampaian hehe. Kita ambil contoh saja seperti streamer yang membutuhkan dua monitor yang satu untuk bermain game dan yang satu lagi untuk membuka dashboard streaming nya agar lebih enak memonitoring stats dari live streamingnya tanpa menekan ALT+TAB untuk berpindah pindah setiap saat. Serta bagi yang baru memulai bergelut di desain grafis tapi memakai monitor yang layar nya berpanel TN itu akan sangat mudah sekali tanpa harus export setengah hasil kemudian pindah ke hp untuk menyesuaikan warna, tinggal drag saja ke layar hp yang dijadikan monitor tadi sudah kelihatan hasilnya.


Lantas bagaimana cara nya ? oke langsung saja kita bahas cara nya ya, dan simak cara nya dibawah ini.

Bahan :
  1. Download Spacedesk untuk primary PC atau PC utama yang ingin di tambahi monitor, KLIK DISINI pilih sesuai OS yang kalian gunakan
  2. Lalu jika kalian ingin menjadikan HP android nya sebagai monitor tambahan untuk PC utama silakan download ini (link playstore) dan apabila kalian ingin menjadikan laptop sebagai monitor tambahan untuk PC utama silakan download ini untuk melanjutkan (versi windows dan untuk versi macOS bisa download disini)
  3. satu jaringan dengan PC utama

Langkah - Langkah :
  1. Pastikan di kedua perangkat sudah terdownload dan sudah di install aplikasi Spacedesk nya untuk bisa melanjutkan ke tahap dual monitor menggunakan android nya.
  2. kemudian buka aplikasi Spacedesk pada PC utama kalian, kira kira tampilan nya akan seperti gambar dibawah ini.

  3. biarkan saja terbuka, kemudian kita beralih ke perangkat yang ingin dijadikan dual monitor oleh PC utama yaitu hp android nya, buka aplikasi Spacedesk nya dan akan tampil daftar perangkat PC utama nya seperti gambar diabawah ini.
  4. kemudian klik tulisan Connection : -ip komputer utama-
  5. dan voila! anda sudah berhasil menjadikan hp android kalian sebagai monitor tambahan untuk pc kalian.

Note :
  1. proses ini tidak menghambat proses pengisian ulang hp androdi kalian jadi aman jika android nya digunakan sambil pengisian daya berlangsung.
  2. perlu di ingat saat anda berada di jarigan public jangan lupa untuk mematikan spacedesk pada PC utama yang kalian bawa (misal lagi di wifi corner, cafe, dan sebagainya) karena orang lain pun dapat mengendalikan PC kalian jika kalian lupa mematikan nya. cara mematikan nya gampang, tinggal klik tanda titik tiga dibawah logo komputer kecil di aplikasi spacedesk pc kalian kemudian klik dan pilih OFF seperti gambar dibawah ini
  3. untuk mengatur resolusi pada HP android nya, kalian bisa mengatur pada aplikasi spacedesk di android nya dengan klik tanda titik tiga di pojok kanan atas layar kemudian pilih settings > resolution dan atur custom resolution sesuai yang kalian mau. saya pribadi menggunakan resolution 800x600 agar enak dibaca dari jarak 30cm. dikarenakan hp saya kecil jadi saya atur resolusi sedemikian agar tampak besar.
  4. untuk yang menggunakan laptop sama saja proses nya hanya saja beda platform untuk aplikasinya.
Jadi ini cara nya tidak hanya untuk android saja ya, bisa juga untuk laptop juga bahkan tablet. selamat beraktifitas ya para pembaca sekalian, semoga tetap produktif dan sehat. sebelum itu jangan lupa tinggalkan komen jika ada yang ingin di tanyakan dan jangan lupa share ketemen temen kalian agar temen temen kalian tau cara membuat dual monitor menggunakan android! share di sg, snap wa, atau di kanal sosmed kalian terserah yang penting share saja karena ini bermanfaat sekali. dan akhir kata wasalam! 

How to make PC Games run smoothly on 30FPS like a console

**This article language is going fully with Bahasa Indonesia. So, please use a translate. To make sure you understand what you read here*  *NOW THE ARTICLE ARE IN FULL ENGLISH* 


Hi, hope you doing well wherever you ar. Have you ever think that game on console like PS4 or Xbox One feel so smooth ? designed to be more optimal in running games with graphics that are managed in such a way.

Who would have thought, even though it was smooth like that the FPS on the game console is 30 fps. When compared to the PC's 30 fps, it's a lot different even if you use the RTX 2080Ti, why is that? Because there is an out of sync between the number of frames sent to the monitor by the graphics card and the refresh rate on the monitor

Of course, with capable hardware and ready to bulldoze a game with the highest graphics settings and more than 60fps it is very enjoyable and many people have experienced it. Then what about our brothers and sisters who only have PC with minimum hardware according to the requirements listed in the game, and want to play without any lag or stutter or decent on it ?

Besides lag, this can eliminate tearing while playing games. Important, the time in sending a frame is called frametime and the frametime needed to send 30fps is 33.33 milliseconds. So, how do we make 30 fps on a PC game as smooth as a console? see how to make 30fps PC games as smooth as consoles (PS4/XBOX1) below:

  1. Turn off v-sync and frame limiter in your in-game settings.
  2. Then, download Rivatuner Statistics Server (RTSS) here (guru3d.com link) or you can install MSI Afterburner with RTSS bundle.
  3. Install RTSS and then run the program.
  4. If the application is open, please click the green "add" button, then browse to the exe file of the game you want to set. see picture below for demo.

  5. Then click your game on the RTSS you just added and set the frame limiter to 30, for more details, please see the image below.

  6. Hold on, not finished yet. after that minimize the RTSS and don't close it. Then download Nvidia Profile Inspector  here (github link from DeadManWalkingTO).
  7. If it has been downloaded, extract the Nvidia Profile Inspector then run the program.
  8. Wait for the loading from the Nvidia Profile Inspector to complete, then browse the game title on the profile in the top menubar, for more details see the image below. 

  9. If so, look for the Sync and Refresh section and click Vertical Sync then change the value to 1/2 Refresh Rate. Like the picture below.

  10. And if you have clicked apply change on the Nvidia Profile Inspector. and close if it has been applied.
  11. Then run the game with RTSS are still running (so every time you want to play the game, first open the RTSS application so that the configuration is loaded)
*this method applies to Nvidia graphics cards, there is no other way but to change the refresh rate through the control panel every time you want to play the game for graphics card users other than nvidia

Tara .. and you will get smooth gameplay like a console (PS4/XBOX1). This method is useful for those of you who want to get a stable frame, keep in mind you have to keep V-Sync and frame limiter off in-game then to get a beautiful and smooth movement visual,
please turn on Motion Blur in in-game.
Because the average game on the console to cover terrible experience they add a Motion blur effect to the game so that the image looks smooth.

and the following video results from the configuration of making a PC game run at 30fps as smooth as a console:

Alright, that's it for this article. and thanks for Maya for the advice, if there is something you want to ask, or so, please leave it in the comments column. See you in the next article.

Mengatasi Mic Headphone Noise, Kabel USB, dan Casing menyetrum dengan Grounding

Hallo, dimanapun kalian berada semoga sehat selalu ya. Kalian pernah ngalamin kesetrum casing pc atau komputer ? pernah gak sih, waktu lagi mabar kamu disuruh push to-talk mic kalian dikarenakan berisik kayak lagi disamping mesin ? atau pernah gak lagi mau nyolok sesuatu menggunakan kabel USB tapi pas pegang ujung konektor nya kesetrum ? Nah ini disebab kan oleh listrik statis.

Listirk statis merupakan ketidakseimbangan listrik pada benda atau hasil perbedaan muatan listrik antara kedua permukaan dan terjadnya perpindahan elektron, kalian tidak usah terlalu risau akan hal ini tapi disisi lain pastikan anda tidak bermuatan statis saat ingin mengganti komponen komputer atau pc kalian agar tidak merusak komponen anda. Ada banyak cara dalam mengatasi nya, salah satu nya dengan grounding. 

Pengertian grounding sendiri merupakan cara instalasi listrik untuk pelepasan muatan listrik berlebih dengan cara mengalirkan ke tanah, Mengapa dialirkan ke tanah ? karena tanah memiliki massa dan volume yang luas sehingga dapat menetralkan muatan listrik berlebih sekaligus petir sekalipun. Jadi melakukan grounding pada komputer kalian bisa menghindari komputer kalian dari sambaran petir, sehingga aman digunakan saat hujan.

Grounding yang akan kita lakukan adalah grounding pada casing pc nya, cara nya sangat mudah dan sudah cukup efektif. untuk melakukan nya silakan simak cara grounding pc atau komputer dibawah ini :
  • Bahan :
  1. Kabel dengan tembaga yang besar (jangan yang berserabut)
  2. Paku besar


  • Langkah grounding pc :
  1. Kelupas kedua ujung kulit kabel secukupnya hingga tersisa tembaga nya seperti gambar diatas (kita sebut saja ujung 1 dan ujung 2, biar mudah)
  2. Jika sudah di kelupas, lilitkan ujung 1 ke paku. seperti gambar dibawah ini

  3. Jika sudah, pastikan pc atau komputer benar benar mati dan lepaskan dari aliran listrik (cabut kabel stopkontaknya) kemudian lilitkan ujung kabel 1 ke baut PSU, lilit secukupnya saja agar baut bisa dikencang kan kembali. seperti gambar dibawah ini

  4. Jika sudah, tancapkan paku yang sudah terlilit tembaga tadi ke tanah. jangan di dinding ya, karena kurang efektif dan apabila sudah di kramik lantai nya mohon di bor kecil saja untuk membuat lobang. seperti gambar dibawah ini

  5. Pastikan paku benar benar menancap ketanah agar lantai tidak nyetrum. lalu coba hidupkan komputer kalian dan coba raba raba bagian casing yang nyetrum dan port usb pada front panel apakah masih nyetrum atau tidak.

Mudah bukan cara grounding pada casing komputer nya ? tentu saja selain hemat biaya, kalian juga mudah dalam mencari bahan nya karena sudah pasti ada disekeliling kalian. Keuntungan dalam grounding casing computer ini adalah melindungi komputer kalian agar tidak tersambar petir, serta melindungi part komponen komputer kalian dari kerusakan karena kalau kebanyakan getaran dari listrik statis juga dapat menybabkan kerusakan pada part pc baik yang internal atau eksternal seperti headset kalian dan itu sebabnya mengapa kalian saat on mic itu berisik karena ada muatan listrik berlebih pada lubang jack kalian sehingga grounding dapat mengatasi mic kalian agar tidak noise. saya harap dengan terpublish nya artikel ini tidak ada lagi komputer yang tersambar petir atau minimal kalian bisa tau agar suatu saat kalian punya pc tidak kesetrum setruman manja hehe.

Apabila ada yang ingin di tanyakan, berpendapat, dan memberi masukan tentang artikelnya silakan tinggalkan komentar dibawah agar kita belajar bersama sama. sekian dari saya, dan sampai jumpa di artikel berikutnya. 

Cara memotong video tanpa kehilangan kualitas dan FPS (tanpa rendering atau re-encode) secara cepat

Halo semua, semoga sehat selalu dimanapun anda berada. aktifitas di rumah aja bakalan terus berlanjut nih, dan aktifitas gaming tentu akan semakin intense ya ? nah untuk mengisi waktu dari pada main game terus pasti kalian butuh hal baru kan untuk mengisi hari hari dengan tagar #dirumahaja agar berwarna, mungkin saat scrolling kalian pernah melihat video video gameplay seseorang di facebook atau di instagram yang memiliki kualitas yang bagus dan FPS yang tinggi bukan ? 


Nah, untuk itu bagaimana sih caranya ? apakah butuh spek tinggi untuk rendering nya ? atau bisa ya kalo di android saja ngebuat video seperti itu ? Itu sebenernya gampang temen temen, tanpa rendering atau tanpa re-encoding pula dan pasti nya sangat cepat proses nya. tanpa banyak berkata kata langsung saja simak dibawah ini.

*sebelum lanjut perlu di ingat, FPS tinggi itu berasal dari gameplay anda. jika pada saat main anda hanya mendapatkan dibawah 60fps ya segitulah hasil dari video nya, jadi FPS nya mengikuti dari sumber video tersebut (dari gameplay aktual anda)


berikut aplikasi untuk memotong atau trim video tanpa kehilangan kualitas dan FPS (tanpa rendering atau re-encode) secara cepat :

  1. lossless-cut 

Search This Blog

Powered by Blogger.

About Us

Nama Blog

All About PC

Blog ini hanya membahas tentang pc, jika ada yang lain maka label atau tag nya saya taroh di lain-lain. mari belajar via internet :D

Earn Bitcoin with EZ click, no scam! TESTED BY ME

Advertisement

Formulir Kontak

Name

Email *

Message *